Get ready to ditch the sticky floors and overpriced popcorn. Building your own home cinema isn't just about throwing a big TV into a room; it's about crafting a personalized, immersive experience that rivals — or even surpasses — the local multiplex. This guide will walk you through every critical step of DIY Home Cinema Setup & Installation, transforming a simple space into your ultimate entertainment sanctuary.
At a Glance: Your DIY Home Cinema Checklist
- Plan Your Space: Choose a quiet, dark room. Think acoustics, light control, and layout before buying gear.
- Pick Your Display: Decide between a large TV (OLED/QLED for vibrant colors) or a projector (for true cinema scale).
- Master the Sound: A receiver is your audio hub. Aim for at least 5.1 surround sound, or go for Dolby Atmos for next-level immersion.
- Wire It Right: Plan cable runs through walls or conduits. Label everything, and prioritize surge protection and ventilation.
- Calibrate for Perfection: Don't skip tuning your speakers and display. Factory settings just won't cut it for a true cinematic experience.
- Simplify Control: Unify your system with a universal remote or smart home integration for effortless enjoyment.
Step 1: The Foundation – Room Selection & Preparation
Before you even think about speakers or screens, you need to think about the room. This isn't just a place to put your equipment; it's the canvas for your immersive experience.
Choosing the Perfect Canvas
Your ideal home cinema space should be a quiet, isolated spot where you can easily control ambient light. Basements, spare rooms, or a dedicated bonus space are often prime candidates. Rectangular rooms tend to be acoustically favorable, simplifying speaker placement and sound distribution.
First, decide: Is this a dedicated home theater? This means you're free to install blackout curtains, acoustic panels, and tiered theater seating without compromise. Or is it a multi-use room? If so, you'll need flexibility—think retractable screens, hidden wireless speakers, or furniture that serves dual purposes. Your choice here impacts every subsequent decision.
Mastering Light: The Enemy of a Great Picture
Natural light is the nemesis of any high-quality display, especially projectors. To prevent picture washout and ensure deep blacks, meticulous light control is paramount. Install blackout shades or heavy drapes that completely seal off windows and doors. Even small cracks can let in enough light to diminish your viewing experience. Darker paint on walls and ceilings also helps absorb stray light, preventing reflections that can dull your picture and distract your eye.
The Soundstage: Designing for Acoustics
Great sound is half the battle for immersion. Your room's acoustics play a huge role. Hard surfaces like bare walls, tile floors, and glass reflect sound, leading to echoes and muddied audio. Soft materials, on the other hand, absorb sound, helping to clarify dialogue and tighten bass.
Aim for a balance:
- Walls: Apply acoustic panels or hang thick curtains.
- Floors: Install wall-to-wall carpet or use large, heavy rugs.
- Ceilings: Consider acoustic tiles or baffles to reduce overhead reflections.
For true sound isolation, insulate walls and doors to prevent sound from bleeding in or out. This also helps you crank up the volume without disturbing the rest of your household. For more in-depth guidance on taming your room's sound, you might find our primer on acoustic treatments incredibly helpful.
Visual Harmony: The Power of Darkness
Just as crucial as acoustic design is the visual aesthetic. Paint your walls and ceiling in darker, non-reflective colors – deep grays, blues, or even black. This isn't just for style; it prevents light from the screen or projector from reflecting back onto the walls and washing out the image. Your focus should be solely on the display, making the picture pop with contrast and vibrancy.
Laying It Out: Where Everything Goes
Before you commit to gear, sketch out your room layout. Your primary viewing position should be directly in front of the screen, ensuring a clear line of sight and an unobstructed path for sound from all speakers. Avoid placing seating too close to walls or in tight corners, as this can create acoustic "hot spots" or distort bass frequencies. Think of it like designing a mini concert hall for your eyes and ears.
Step 2: The Window to Worlds – Your Display System
This is arguably the most impactful choice for your visual experience: TV or projector? Each has distinct advantages and demands.
TVs: The Modern Marvel
For many DIY home cinema enthusiasts, a modern TV is the simplest path to stunning visuals. Contemporary OLED and QLED models, particularly in 4K or even 8K, offer incredible picture quality with deep blacks, vibrant colors, and impressive brightness. They perform well even with some ambient light, making them perfect for multi-use rooms. TVs are generally easier to set up, requiring less calibration and maintenance than a projector system. They're ideal for smaller to mid-sized rooms or straightforward setups where convenience is key.
Projectors: The True Cinematic Scale
If you dream of screen sizes 100 inches and beyond, a projector is your ticket to a true cinema feel. However, they come with a few more requirements:
- Controlled Lighting: Projectors demand a very dark room to shine.
- Throw Distance: You'll need sufficient space between the projector and the screen.
- Quality Screen: A dedicated fixed screen is essential for optimal picture quality; projecting directly onto a painted wall, while possible, won't deliver the same punch.
Mounting a projector and running the necessary wires (HDMI, power) typically involves more effort than simply placing a TV on a stand. If you're weighing the pros and cons, consider our guide on choosing between a projector and a TV.
Screen Size & Resolution: Finding Your Sweet Spot
The goal is an immersive picture that fills your field of vision without eye strain. Experts recommend your screen should take up 30-40 degrees of your horizontal field of view.
- Viewing Distance: The farther you sit, the larger your screen needs to be to maintain immersion. For example, a 70-inch TV generally requires a viewing distance of 9-15 feet.
- Resolution: 4K Ultra HD (2160p) offers significantly more detail and clarity than 1080p (Full HD) or 720p, especially when you're sitting relatively close to a large screen. The "p" in 2160p or 1080p stands for progressive scan, which is generally preferred over interlaced ("i") scanning for smoother motion. For a truly immersive experience, 4K is now considered the minimum standard for a home cinema.
Step 3: The Sound Barrier – Your Audio System
A truly great home cinema isn't just about the picture; it's about sound that wraps around you, putting you in the movie.
Speaker Configurations: More Than Just Volume
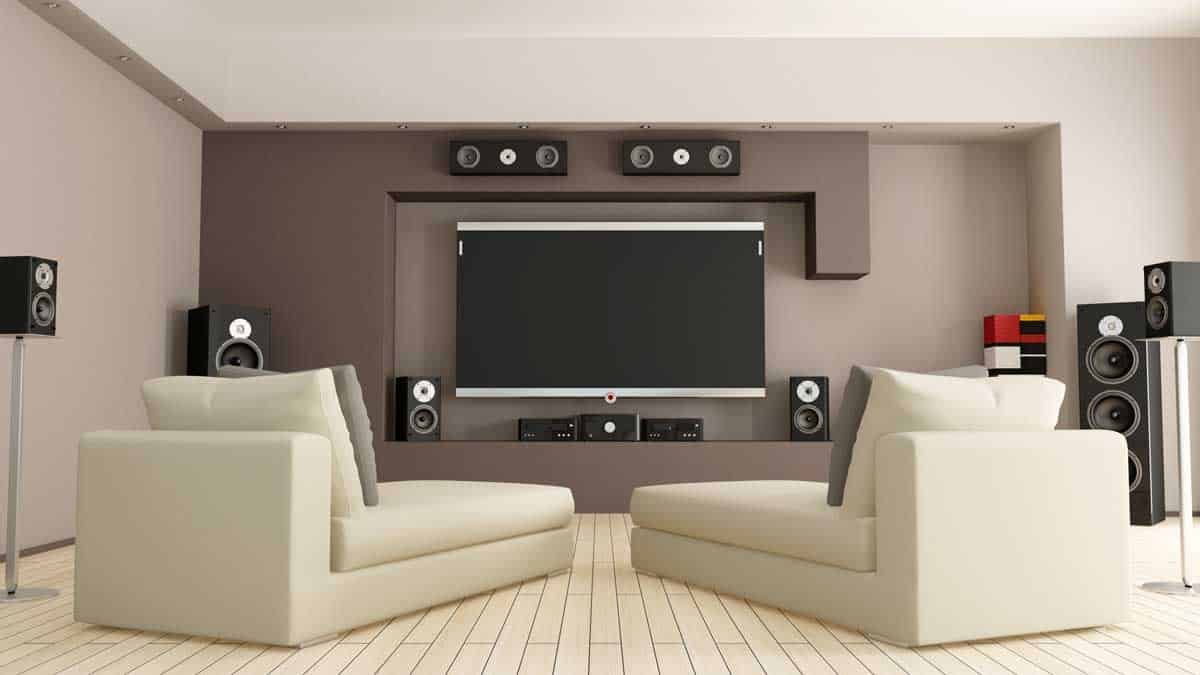
- 5.1 System: This is the bedrock of surround sound. It includes five main speakers (front left, center, front right, rear left, rear right) and one subwoofer for bass. It's a fantastic starting point for immersive audio.
- 7.1 System: Building on 5.1, this adds two more speakers positioned behind the seating, creating a more enveloping soundstage and greater depth.
- Dolby Atmos: The current gold standard, Dolby Atmos adds height channels, typically through in-ceiling speakers or upward-firing units that bounce sound off the ceiling. This creates a truly three-dimensional soundscape, making helicopters feel like they're flying overhead and rain sound like it's falling around you. If your budget allows, Atmos is a game-changer.
Precision Placement: Where Every Speaker Belongs
Correct speaker placement is non-negotiable for optimal sound. Even the best speakers will underperform if poorly positioned.
- Front Left/Right: Position these at ear-level when seated, angled slightly inward towards your primary listening position, flanking the display.
- Center Speaker: This is crucial for clear dialogue. Place it directly above or below your screen, precisely in the middle.
- Surround Speakers (for 5.1/7.1): For 5.1, place them to the sides or slightly behind your seating, raised about two feet above ear level. For 7.1, the additional rear speakers go along the back wall, either side-by-side in the center or separated and angled inward.
- Subwoofer: Often the trickiest. Start by placing it along the front wall, ideally in the middle. However, every room is different. The "subwoofer crawl" method involves placing the subwoofer in your listening position, then crawling around the room to find where the bass sounds best. That's where your subwoofer should go!
- Height Speakers (for Dolby Atmos): These should be in-ceiling, or if using upward-firing speakers, placed on top of your front (and sometimes rear) speakers, angled to bounce sound off the ceiling.
- Additional Speakers (e.g., 9.1, 11.1): For advanced setups, you might add high-up front speakers, above your main front pair, angled downwards.
General Rule: Ensure every speaker has a clear, unobstructed path to your ears. Avoid tucking them into tight corners or behind furniture, which can muffle sound and create unwanted reflections. For a deeper dive into choosing the right speakers, check out our in-depth speaker buying guide.
Alternative Audio Solutions
- Sound Bars: While not true home cinema, modern sound bars (often 2.1 systems with a subwoofer) offer a significant upgrade over TV speakers. They're great for smaller rooms, apartments, or when minimizing clutter and wiring is a priority. Some even offer virtual surround sound or upward-firing drivers for a simulated Atmos effect.
- Component Surround Sound Packages: These pre-matched systems often include a receiver and a full set of speakers, making them ideal for beginners. Many now offer wireless rear speakers, simplifying installation.
Movies vs. Music: While home cinema systems excel at immersive surround sound for movies, audiophiles focused primarily on music might prioritize two high-quality stereo speakers and a robust receiver. For music, speaker quality and the receiver's audio processing are often more important than the sheer number of channels.
Step 4: The Central Nervous System – Core Components & Connectivity
At the heart of every great home cinema is a well-chosen set of core components, all working in harmony.
The Home Theater Receiver: Your System's Brain
A home theater receiver is non-negotiable. It's the central hub for all your components:
- It takes video signals from your Blu-Ray player, game console, or streaming device.
- It processes and amplifies audio for all your speakers.
- It sends the video signal to your TV or projector.
- It simplifies input switching, allowing you to seamlessly move from gaming to a movie.
Ensure you choose a receiver designed for home theater, capable of handling both video and audio processing, with enough HDMI inputs for all your devices (and a few spares for future upgrades).
Video Input Systems: Your Entertainment Sources
While your smart TV might have built-in apps, dedicated components often offer superior performance and flexibility.
- DVD/Blu-Ray Player: For physical media collections. Blu-Ray (or 4K Ultra HD Blu-Ray) players are vastly superior to outdated DVD players in terms of picture and sound quality.
- Game Console (e.g., PlayStation 5, Xbox Series X): Modern consoles are powerful all-in-one entertainment systems, capable of playing games, streaming 4K content, and even playing Blu-Ray discs.
- Smart TV Adapter (e.g., Apple TV 4K, Amazon Fire TV Stick 4K, Chromecast with Google TV): These are excellent for converting a "dumb" TV into a smart one, or for providing a streamlined interface for streaming services. Just remember they won't play your existing physical media collection.
Powering Up: Electrical Outlets & Component Placement
You'll need more electrical outlets than you think! Plan for multiple power strips near your TV and receiver. Place your receiver and other components (Blu-Ray player, game console, etc.) in an AV cabinet or on a rack, ideally below the TV. Ensure they are evenly spaced to allow for proper airflow and prevent overheating, which can shorten component lifespan.
Step 5: The Unseen Network – Wiring & Power Management
The mark of a professional home cinema is how seamlessly everything is integrated, especially the wiring.
The Wiring Blueprint: Hide It All
A detailed wiring plan is essential, especially if you're undertaking construction or remodeling. Run all your cables – speaker wire, HDMI, Ethernet, and potentially optical or coaxial lines – through walls, ceilings, or dedicated conduits. This keeps them out of sight, prevents tripping hazards, and maintains a clean aesthetic.
Pro Tip: Label every single cable at both ends. You'll thank yourself later when troubleshooting or upgrading. For a detailed breakdown of crucial connections, including everything you need to know about HDMI cables, consult our specialized guide.
Power Supply: Clean & Protected
Home theaters draw significant electricity. Ideally, your system should be on a dedicated electrical circuit to prevent power fluctuations that can impact performance. Invest in quality surge protection, such as a power conditioner. This not only protects your valuable equipment from power spikes but can also "clean up" the electrical current, potentially improving audio and video performance.
When running cables, always leave some slack. Components change, and you might need to reposition something or add new gear. An AV receiver rack with extra space is always a good idea for future upgrades.
Ventilation: Keep It Cool
Electronics generate heat, and heat is the enemy of longevity. Proper ventilation is critical. If your AV receiver and other components are in an enclosed cabinet, ensure there's ample open space around them for airflow. Consider installing ventilation grilles or even quiet, thermostatically controlled cooling fans to actively circulate air. Always leave a few inches of space behind components for heat to dissipate.
Step 6: The Maestro's Touch – Control & Calibration
You've built your cinema; now it's time to refine it and make it effortless to use.
Simplifying Operation: Unified Control
Nobody wants to juggle five different remotes. Simplify your life with a universal remote or, even better, a smart automation system. Solutions like Logitech Harmony, Control4, or even dedicated smartphone apps can unify control of your AV components, lighting, motorized blinds, and climate control into a single interface. Voice assistants (like Alexa or Google Assistant) can handle basic commands, adding another layer of convenience. The goal is seamless, intuitive integration so you can spend less time fumbling and more time enjoying. For more ideas on unifying your tech, explore our smart home integration tips.
Calibration: Unlocking True Potential
This is where your DIY home cinema transforms from "good" to "phenomenal." Never rely on factory settings—they're generic.
- Receiver Calibration (Audio): Most AV receivers come with a setup microphone. Use it! This mic measures speaker distances, adjusts individual speaker volume levels, and corrects for your room's unique acoustic properties using sophisticated room calibration software (like Audyssey, Dirac, or Yamaha's YPAO). This process is vital for balanced, accurate surround sound.
- Video Calibration (Display): Manually adjust your display's brightness, contrast, color accuracy, and sharpness. You can use calibration discs (e.g., Spears & Munsil, Disney WOW) or downloadable test patterns. While professional calibrators can achieve pixel-perfect results, even a DIY calibration makes a world of difference in picture quality.
- Testing: Once calibrated, watch a few familiar movies and demo scenes. Pay attention to dialogue clarity, bass response, and overall picture vibrancy. Don't be afraid to make minor tweaks until everything sounds and looks just right. Calibration isn't a one-time event; it's an ongoing habit for optimal performance.
Step 7: First Run & Troubleshooting – Getting It Live
It's time to bring your creation to life!
Initial Setup: Connecting the Dots
- Unplug Everything: Before making any connections, ensure all your components are unplugged from power. Safety first!
- Receiver to TV: Connect an HDMI cable from the "HDMI Out" port on your receiver to an "HDMI In" port on your TV or projector. Note which input you use (e.g., HDMI 1).
- Video Sources to Receiver: Connect your Blu-Ray player, game console, or streaming device's "HDMI Out" to any available "HDMI In" ports on your receiver. Again, keep track of which input is which.
Video Test: Seeing is Believing
- Power On: Plug in and power on your TV/projector, then your receiver, and finally one of your media players (e.g., Blu-Ray player).
- Select Input: On your TV, select the HDMI input you connected your receiver to. On your receiver, select the input corresponding to your media player (e.g., "Blu-Ray" or "Game").
- Troubleshoot: If you don't see a picture, double-check all HDMI connections. Try bypassing the receiver entirely by connecting your media player directly to the TV to isolate if the issue is with the player or the receiver.
Speaker Connection: The Voice of Your Cinema
- Wire Speakers: Connect speaker wires from each speaker to the corresponding "Audio Output" channels on your receiver. Pay close attention: red (+) to red, black (-) to black. Most receivers clearly label "front left," "center," "rear right," etc.
- Subwoofer: Your subwoofer typically connects via a single RCA cable to the "sub out" or "sub pre-out" port on your receiver.
- Strip Wires: If your speaker wires aren't pre-terminated, carefully strip about half an inch of insulation from the ends.
Speaker Test: Hearing the Magic
- Receiver Setup: Go into your receiver's on-screen menu. There's usually a "speaker setup" or "test tone" option.
- Test Tones: The receiver will play test tones through each speaker individually. Confirm that sound comes from the correct speaker and that it's clear.
- Troubleshoot Audio: If a speaker isn't working, check the receiver's channel settings, ensure firm wire connections, and verify that the red/black polarity is correct. A quick test with a simple audio player (like an old iPod) directly connected to a speaker can help confirm if the speaker itself is working.
Wire Management: The Finishing Touch
Once everything is working, the final step is to make it look clean. Professionally hide wires under rugs, along baseboards using cable raceways, or within walls. This prevents tripping hazards and maintains the polished aesthetic you’ve worked so hard to create.
Beyond the Build: Maintaining Your Immersive Experience
Congratulations, you've built a home cinema! But the journey doesn't end here. Regular calibration checks (especially after moving speakers or furniture), software updates for your receiver and display, and keeping your equipment dust-free will ensure your system performs at its peak for years to come. This isn't just a setup; it's an ongoing relationship with unparalleled entertainment.
Remember, this is your space, designed for your enjoyment. Take pride in your DIY Home Cinema Setup & Installation, sit back, and enjoy the show! To dive even deeper into all things home entertainment, Explore our HD Holed hub for more expert guides and insights.